In most states, you can simply order a percussion revolver by mail since it is a replica of a firearm made in 1898 or before and doesn’t go through the FFL process. The downside to this is that after the much anticipated wait between pressing “purchase” to when it arrives on your doorstep, you end up getting what you get.
You didn’t hand pick this particular revolver from the display case, it was picked by an associate at the store.
As my kids would say, “you get what you get and you don’t throw a fit!”
Know that these revolvers all seem to come about 90-95% complete as far as their fit and finish. If you’re lucky, you’ll get a gem! But for most of us mere mortals, you’ll end up with a revolver that is going to need a little amateur gunsmithing to get it where you need it to be for your trip to the range.
Let’s dive into the top 7 things to check and replace with your revolver to see how much of a lemon you receive. Remember though, these things can be corrected, and your lemon is just that — it’s yours. Let’s show it some TLC and it’ll be a faithful companion for years to come!
Safety and reliability are our goals here, so let’s get started!
Replace the Cones (Nipples)
Before you even purchase your revolver, you’re going to want to consider a few other obligatory purchases. The first of which is replacement cones, or nipples. If you’re new to black powder revolvers, these are the 5 or 6 (depending on your model) protrusions on your side of the cylinder where you place a percussion cap.
I can’t recommend SliXshot nipples enough! I am NOT an affiliate, I just love their product.
The cones that come from the factory are narrower and don’t hold a cap as well as SliXshot. The SliXshot nipples also have two side vents that allow for the cap to deform in a predictable way after each and every shot. Namely, two sides of the cap hold onto the nipple, and two are flared out.
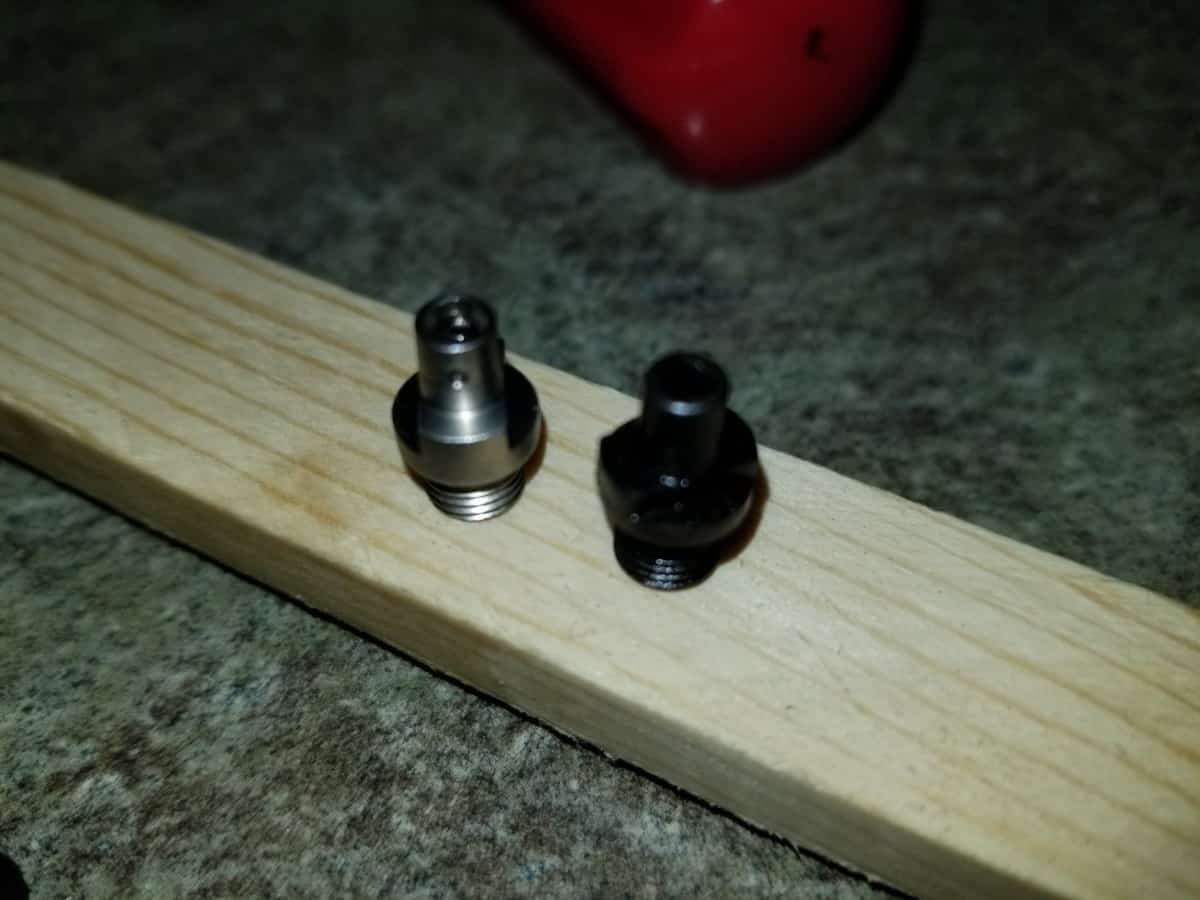
I can’t prove it, but I also believe that the side vents prevent caps from falling into the action by not only allowing two sides of the cap to still grip the nipple, but the blow-back of the gasses of the discharging powder through the small hole in the cone hits against the hammer, but the path of least resistance for that gas is out the sidewalls of the cone and not to violently push the hammer back and blow a cap back into the action.
I experience about 1 cap jam per 100 shots since switching. Cap jams were maybe 1 out of 6 shots with the factory cones. It’s a no-brainer.
For the $35-$40 that you’ll spend, you’ll be thankful at the range when you dramatically reduce the number of cap jams that you’ll experience and improve the overall reliability of your revolver!
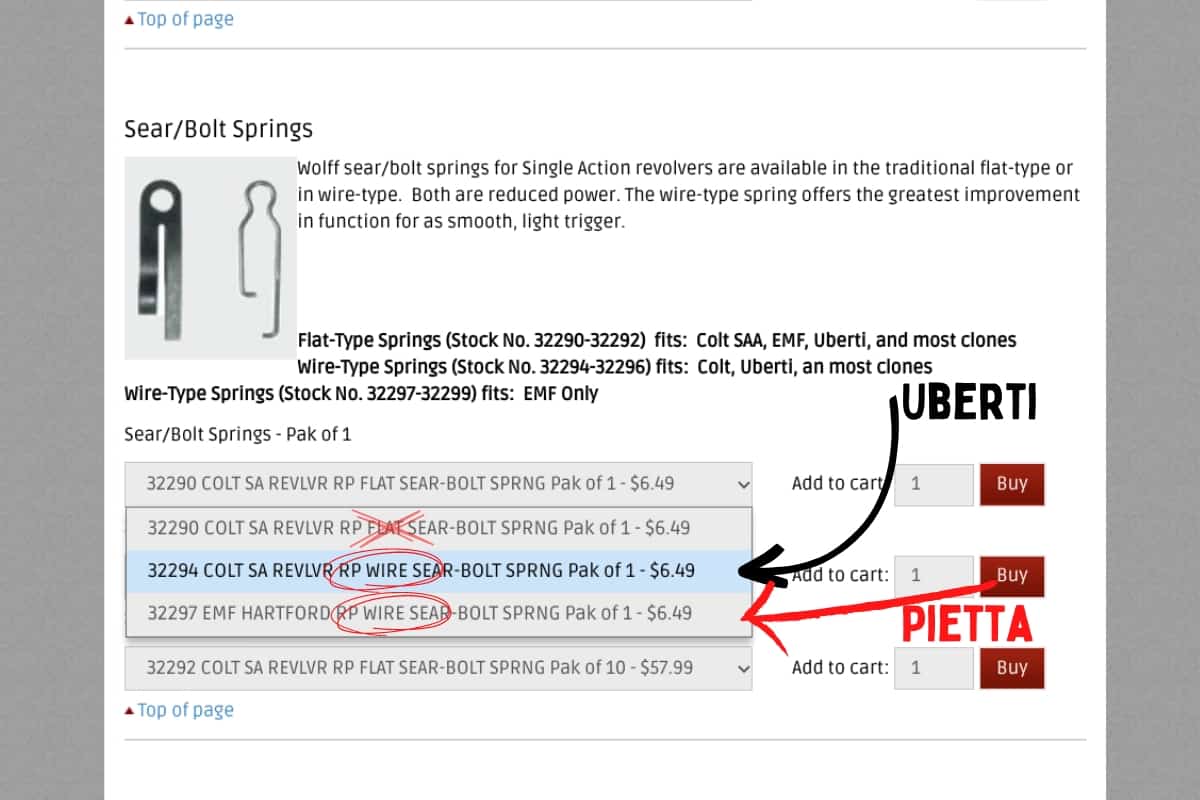
Replace the Trigger Bolt Spring
Replacing the trigger bolt spring on your cap and ball replica is also going to be something you’ll want to do sooner than later.
In an ideal world, this spring would be made of spring steel, but instead it’s just cheap pot metal that is blued to look outwardly nice.
When I received my first black powder revolver, I didn’t pull the hammer back more than a dozen times straight out of the box and I heard a snap and the action stopped working. This spring has two “fingers” and one of them simply snapped.
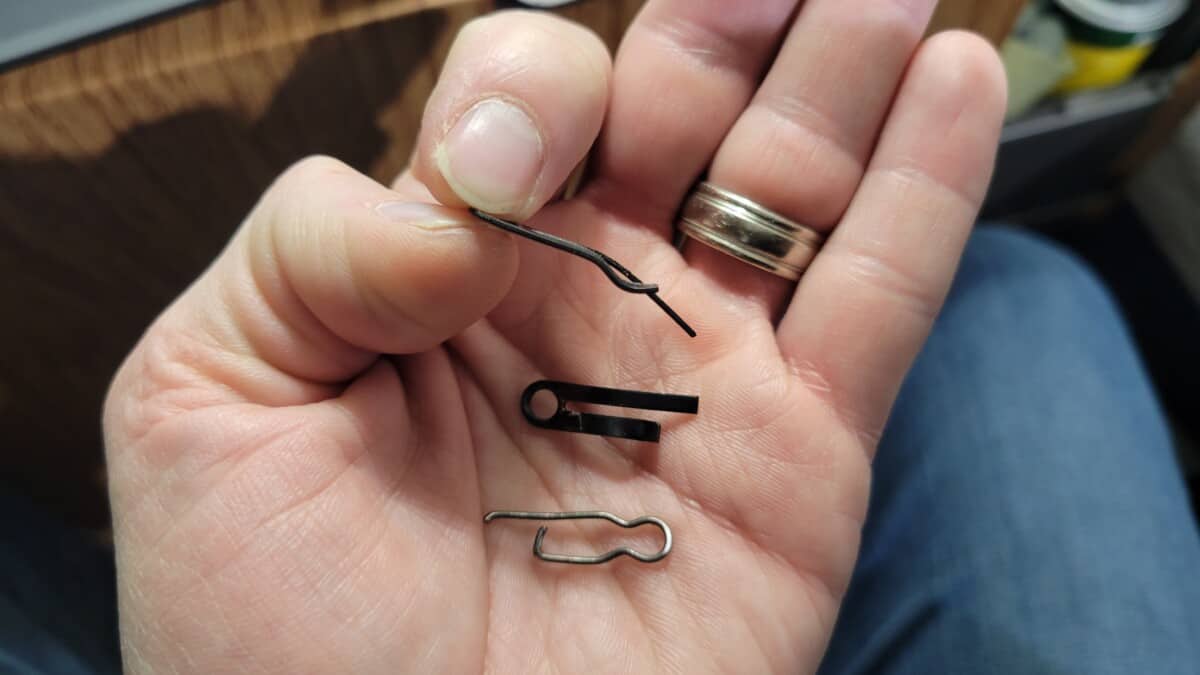
Looking at the exposed interior metal, it was porous and clearly pot metal.
I recommend buying Wolff springs, or you can make your own with piano wire. I made one out of piano wire for my 1849 Pocket Model since Wolff doesn’t make a spring for it, but I don’t have a jig and it took over an hour to get it just right with vice grips, pliers, and a nail to bend around.
Just get this part replaced and save the embarrassment of pulling your pistol at the range only to find that the action has completely failed!
Check the Timing
Next, you’re going to want to check the timing and make sure that the next chamber in the cylinder properly lines up with the barrel and locks into place at the end of your hammer pull.
You’ll want to verify the timing by first pulling the hammer back slowly for two full cylinder rotations, and also pull the hammer back fast for two full cylinder rotations.
A slow hammer pull will sometimes not reveal a timing issue and that’s why I recommend pulling the hammer back quickly as well. My 1849 Pocket Model performed perfectly at slow speeds but if I pulled the hammer back quickly (like my life depended on it), the cylinder would overtravel by nearly 1/4″ each and every time.
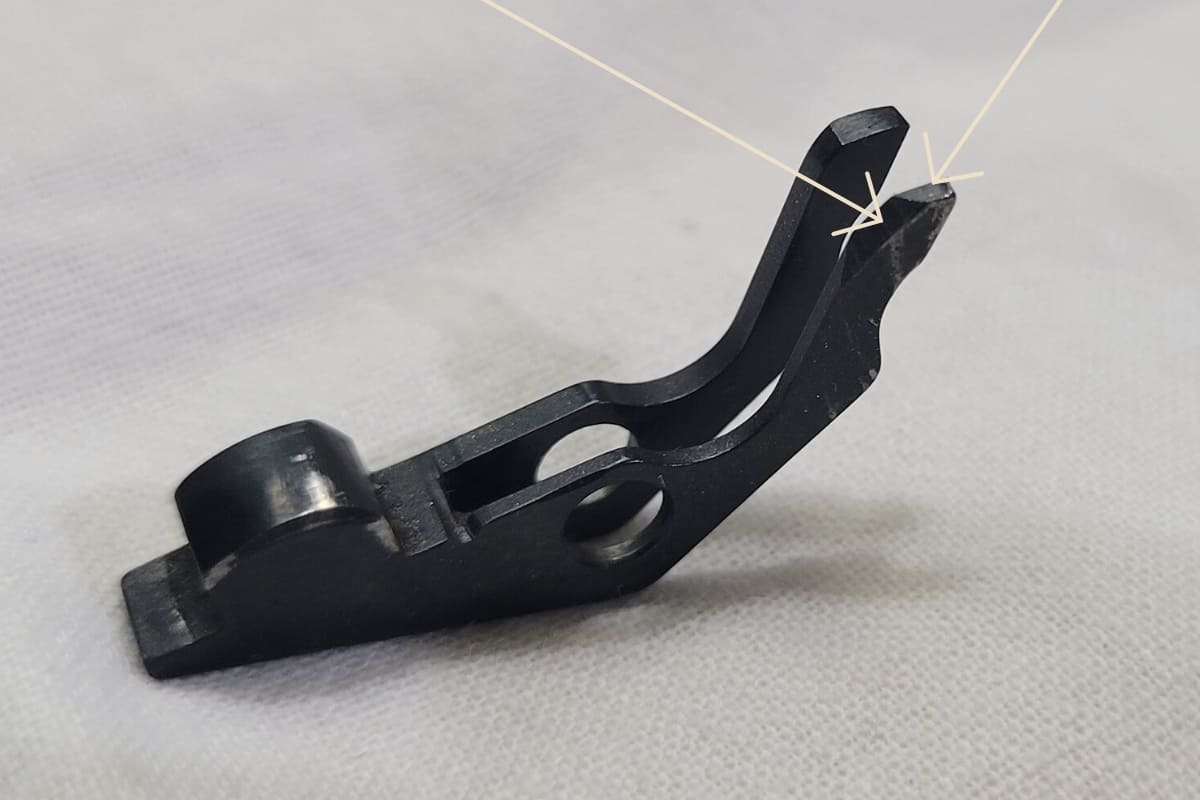
I’d have to manually turn the cylinder backwards until it locked into place.
Luckily, this issue can be corrected with a piece of fine sandpaper glued to a small wooden block and lots of patience. You’ll need to methodically file down one of the “fingers” of the bolt stop spring. I have an entire article here that is dedicated exclusively to this issue. Please check it out and I’m sure it will answer all of your questions!
Check for Cylinder Gap
Next, you’ll want to check out the cylinder gap. Now, for as much as I despise Pietta for making their revolvers look like overpriced toy cap guns by slapping their markings and warnings all over the side of the barrel, they do seem to have their cylinder gaps under control by my experience and all of the research I’ve done on forums.
The issue tends to arise with the cylinder arbor not bottoming out inside of the barrel assembly and it causes a cascade of micro issues from there.
Since this problem will likely just happen with Uberti replicas, you’ll want to get a 5mm split washer to put in the recess of the barrel assembly where the cylinder arbor inserts. From there, you’ll need to widen the barrel wedge ever so slightly, and follow up by filing the forcing cone if there’s any contact between it and the cylinder.
It sounds like a lot, and it’s hard to put it in words. That’s why I made a full video showing you exactly what I did below.
Dry Load and Check for Bullet Retention (Chainfire Prevention)
This video I made below does a better job of visually showing what’s happening with this situation but I’ll sum it up anyway.
From the factory, there is the possibility that when the chambers were drilled out in the cylinder, that burrs were left on the throat (rim) of the chambers. These burrs cause an imperceivable overhang that actually causes the throat of the chamber to be slightly smaller than the actual inner diameter of the chamber once you get past the burr.
Since steel is stronger than lead, that burr will actually cause your roundball or bullet to be slightly undersized for the chamber once it’s seated. It still cut a ring of lead, which may lead you to believe that you’re safe from chainfire, but the burr cut off too much lead.
In my case, where 5 out of 6 of my Pietta chambers was affected, I could see daylight (barely) when I did a dry load (no powder, just the round ball), removed the cones/nipples, and shone a bright flashlight behind the cylinder.
When it would fire the revolver or even gave it a little shake, the roundballs in the neighboring chambers would work their way forward since they didn’t have a friction fit.
Having a slightly undersized roundball is dangerous because it allows spark and flame from a discharging round to get between the neighboring roundballs and their chamber walls and ignite the powder behind them unintentionally. This is what is known as chainfire. Your revolver will fire off one or more chambers that you didn’t intend to fire, and it will happen with those chambers not lined up with the barrel. You can hurt yourself or damage your revolver in the process.
You will need to use a drill press on its lowest setting and a small, tapered grinding stone for a hand rotary tool to remove the burr. I show exactly how to do this in the video below.
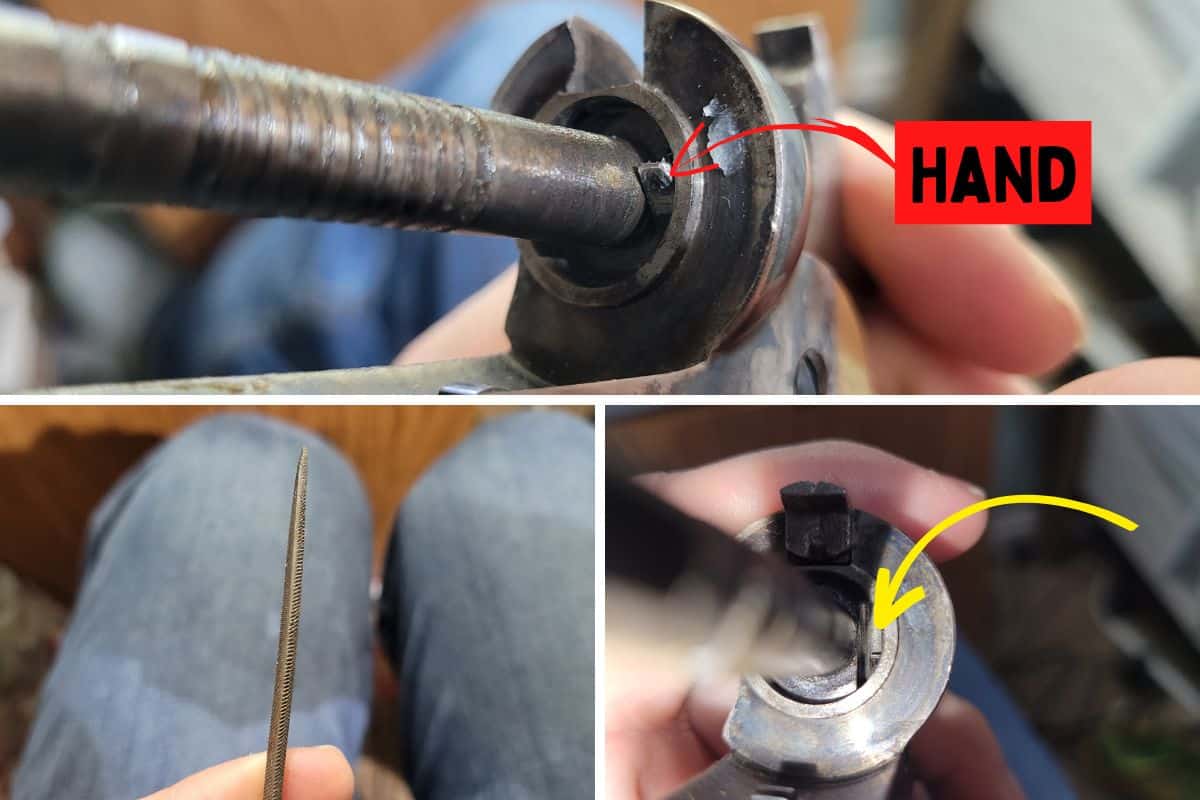
Check if the Hammer is Getting Stuck
Finally, if you notice that your hammer is getting stuck when you try to pull it back (it maybe pulls back 1/4″ and stops), then you will want to first make sure that you’re lubing up the cylinder arbor with a beeswax-tallow mixture, or a beeswax-olive oil mixture. I have an article here with the recipe that I used.
You’ll also want to take the barrel assembly off, followed by the cylinder and check the base of the arbor near the hand. There’s a good chance that the slot for the hand has some rough edges from the factory and is causing it to be pressed into the arbor as it tries to turn the cylinder and is getting bound up. Sometimes you’ll even see a cut in the arbor where this is happening.
I recommend getting some small hand files (Amazon) and using one that is tapered to a point, flat on one side, and rounded on the other to get into the slot for the hand and smoothing up any burrs. Remember to completely disassemble the revolver for this. You will need to remove the hammer and hand.
You can also use sandpaper to remove a little metal from the side of the hand where it is touching the arbor.
My 1849 Pocket model had this issue and doing these steps completely corrected it.
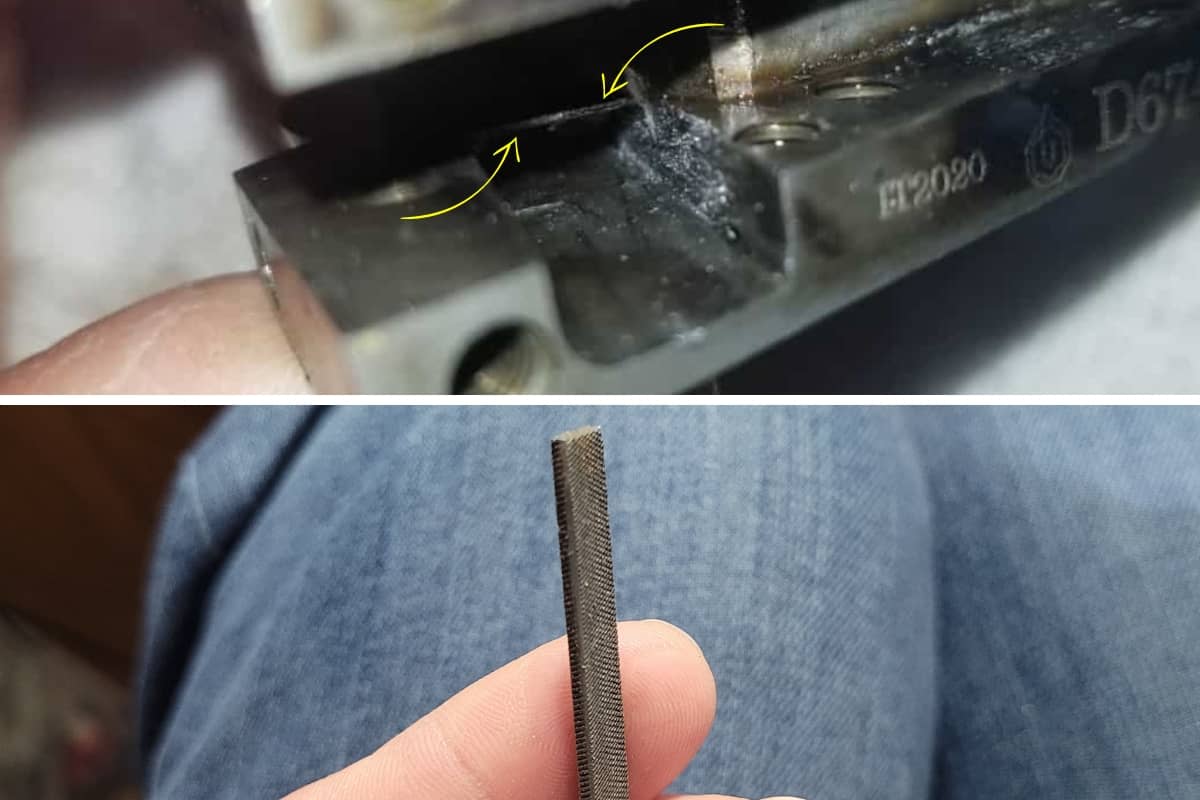
File Out the Hand Slot in the Frame
This one is definitely a problem that plagues the Uberti line of replicas more than the Pietta brand, and I’ve even heard it referred to as the “infamous Uberti step” by a well known black powder YouTuber.
When you disassemble the revolver and go to put it back together, you’ll likely find that you can’t get the hand (which attaches to the hammer) back into the frame. It catches on a “step” from two different depths that have been cut to make the slot for the hand itself.
With the revolver completely disassembled and the hammer and hand removed, use a thin flat file (Amazon) to reduce the intensity of this step until it no longer catches the hand when you try to reassemble the revolver.